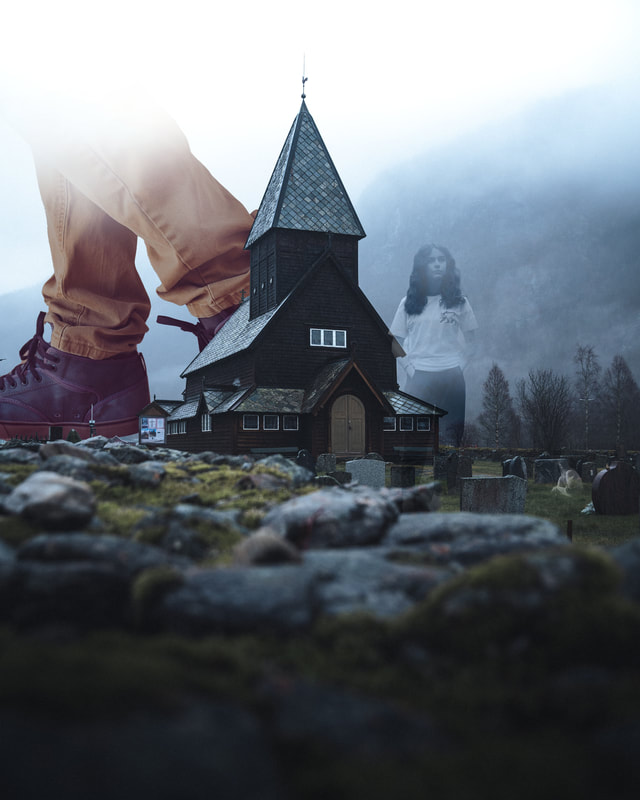
 For this image I used Photoshop. First off, I imported an image of someone walking, and sized it up a ton so it would look like a giant. Then, I used black and white to make it so it was only the feet, and it appeared as though it was behind the building. Then, I knew the image needed more so I decided to add some ghosts. I added one in the graveyard, using filters and such to change the coloring, making it a grayish, and using black and the drawing tool with the soft brush to get rid of some parts so it seemed as though the ghost wasn't fully there. Then, I added another standing on the rocks and did the same thing.
I honestly don't know exactly why I added the legs, but I really liked the idea and I think it turned out pretty cool. Then Mr. B recommended that I looked at my starter image to add more (the church with a graveyard) and I ended up adding some ghosts to the graveyard. I like to think this "fantasy" world has a lot more than just ghosts and giants, but that giants walking around might be seen as normal. I also wanted the legs to be behind the church instead of in front of it because if they were in front, it might be a bit too much. Also, logically, I would have had to have added some of the graves getting crushed under the giants foot, because the graveyard is right there. I think the part I struggled with the most in this project is figuring out where to put things and if I needed to add more. For example, I tried adding multiple other things to it, but I just didn't like the way they worked with the image. I tried adding someone with a sword, to give it more of a medieval feel, but I didn't like that. I even tried adding mysterious wolf, but it just didn't add up. So I just added the two ghosts and the feet to make it so there was multiple things happening in the image, but not too much (also pretty close to rule of odds, but the 2nd ghost is harder to see so not as much).
0 Comments
 To start off, I selected the strawberries and created a new layer. After selecting a reddish color, I pressed alt and delete to make it so that where the strawberries were was the red color. Then, I went through the options for how it would be transparent, and I think I ended up choosing multiply or color. After this, I moved onto everything else. (Although, I think the French toast is my favorite.
One difficulty I had was that the select tool was sometimes not helpful, so I had to resort to clicking Q and manually drawing where I needed. (Drawing as in using black and white to add and subtract.) Another difficulty I had was deciding what to color. For example, some parts were fine without it (the napkin, the utensils), but all of the food needed coloring, and I ended up coloring the metal for the syrup and milk container as well. One skill I developed is that now, if I have any grayscale images I want to colorize, I know how to easily. Especially if I find any really cool images that don't have color, but I can now add color to. I've also seen that this is a job option. I don't know if I'd necessarily have this as a job, because I don't know how much money you'd be earning if you aren't working for a famous museum or something, but I have seen it as one never the less. 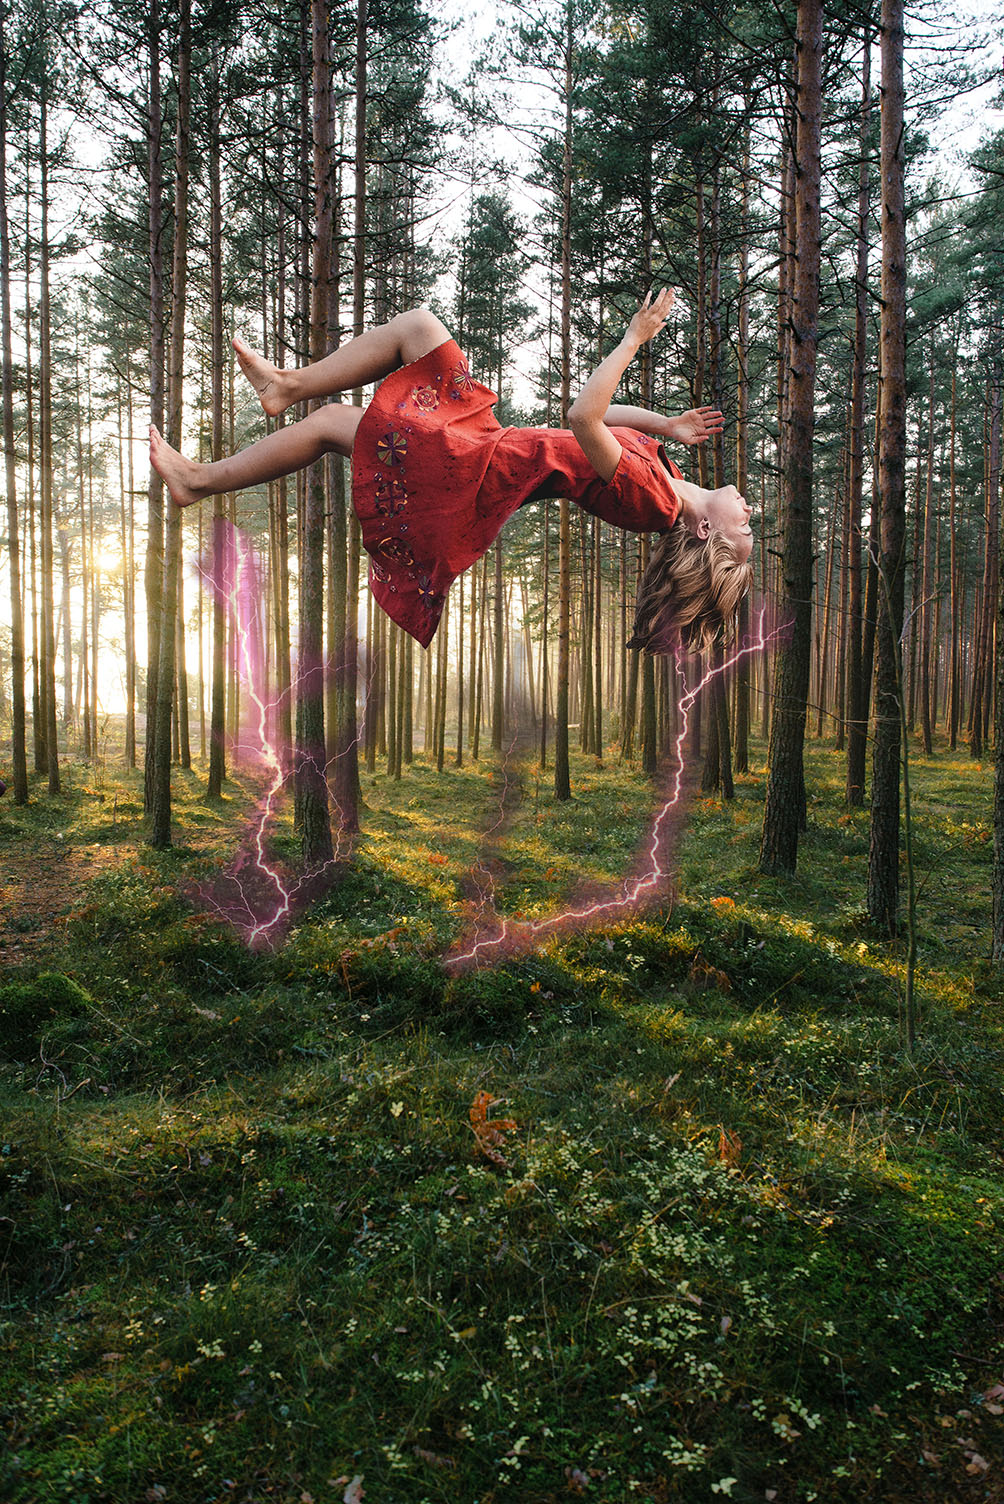 For this assignment, I added something where it probably shouldn't be. I got an image of a woman falling into water, and selected just her. Then I adjusted her position slightly, so that it looks as if she's floating/falling above the forest floor, and used the "colored lightning" requirement to make it look as if she is floating.
One difficulty for me at the start is that I thought we had to use the lasso tool and select it that way in the beginning. I found out that I didn't need to use that tool, and could instead use the quick selection tool. While using it, I still faced some problems, but I just used the brush tool after using it to make the selection more specific. For my design choices, I decided to make her float in the air instead of lying on the ground, because she needed to be somewhere where she "didn't belong" and on the ground made way more sense than falling or floating. I also decided to use the lightning bolt to make it seem more like she was floating, as if her midair wasn't enough. (This is also kind of a reference to a show I watched but not really) It's kind of like the lightning is the thing that was making her float.  In this assignment I learned how to use feathering. I selected around the image and put the feathering up to about 30, and added a new layering mask, making the affect around the bird. After doing this, I adjusted it slightly and made it so that it looks like it's flying by, and took probably too much time adding the colored lighting to the background. I set the opacity lower for the lightning so it doesn't take away from the bird.
One difficulty that I had was that making the mountains visible and making it seem natural with the lightning was pretty hard. I ended up putting the opacity lower on the lightning layer so that I could see the mountains, and zoomed in a lot so that I could get as much of the mountains as I could without going into the sky again. I ended up keeping the opacity of the lightning lower in the end, because I liked it more. I didn't keep it as low though, because I wanted it to still be part of the image. I decided to have the bird flying by the ground with the mountains in the background because I thought it would give a cool affect, especially with the bird being the most prominent feature. I wanted the lightning to be there but I didn't want it to overpower the bird, because it's required but it isn't the main part of the assignment. I ended up really liking the way it came out, and another thing I noticed is that I used the rule of thirds. I didn't realize I was doing this, but this is also (technically) a design choice that I used. |
