I learned a lot about modeling with splines. It was interesting to see the edges and how they worked. For some reason my fonts weren't working, so I was stuck with this one. I definitely will use this in the future, because it taught me how to work with fonts, which could be helpful as an asset modeler because if you're looking into making logos or anything like that it would definitely be helpful. It could also help in making a cover for a game.
0 Comments
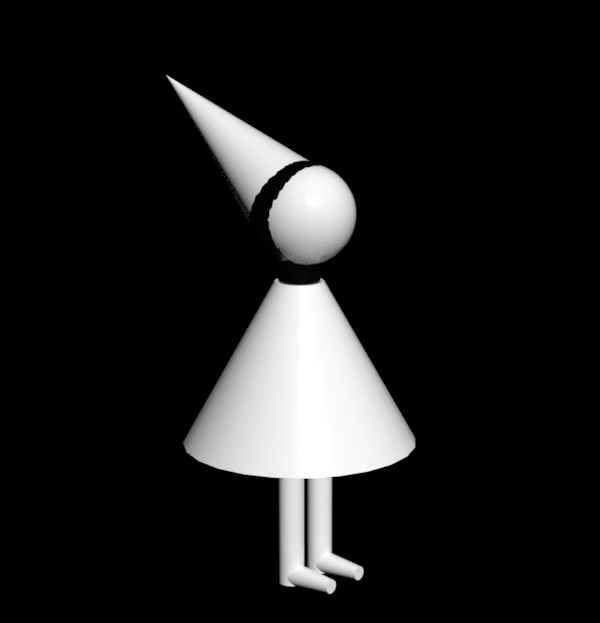
For my box modeling project, I decided to create the main character from Monument Valley. I chose her because it's basically just a ton of easy shapes, but she's pretty distinguishable. I was going to have a different color of background, but it basically wouldn't show the character even with the tint maxed out. I decided on a black background even though it blended in with parts of the character. For the shoes, I didn't know a way to make them look smoother so I had to make them look slightly bad for the sake of being accurate. Then for the rest it was pretty simple shapes. If I could change one thing, I'd want to change the shape of the dress a bit, because it's not just straight down in the picture and it would've been nice to have a little movement.
  Creating the snowman was pretty easy overall. I made some mistakes that, after making the pencil, and if I did it again I would change it. Creating the pencil was actually kind of fun, and now that I understand a bit more of the program I'm excited to go in and learn more about it.
One of the harder things was (in the first one, the snowman) Everything was uneven and after realizing I could set everything to be in the center, I would definitely change that. However, for having so little experience in 3DS max, I feel that I did okay.   In this section, the most helpful thing I was taught how to do was use the array tool. This tool is gonna be something that when I figure out how to use the program in a larger way and start doing my own projects, that it's a fast way to duplicate something in a way that is uniform. We also just learned generally about decluttering things and fixing things up, which'll definitely be helpful. Snapping will also be helpful in this because otherwise, objects will move completely freeform.
One of my difficulties with this section was mainly (without the video) what are the best numbers to import for the array? Would it be best to experiment with all of it or just use a specific set? Grouping objects was overall pretty easy so no problems there. However, with snapping it's a little difficult to use the different kinds, especially because sometimes it decides to not go the direction you want it to. I think this'll help me as an asset modeler because it'll make my scenes way more put together. I can make everything I make more uniform and professional.  In this part of the LinkedIn/Project, we mainly learned the basics of how to use the program and how to set it up best for ourselves. We didn't learn anything super complicated and basically experimented with the tools at hand: using shapes, rendering, and moving/rotating.
Overall, this project was pretty easy but I'd like to learn more about rendering. Currently, I know the basics but I'd say it could still be more polished with the lighting so I'd like to learn how to do that. I'd also be interested to see how the rendering worked with different textures, and I hope to see that in the future. This'll help me with asset modeling because it'll improve the quality of my work. I also know how to render now, which'll be helpful in the future. Using 3Ds max was interesting. I got to set up my 3Ds max to best fit the way I work, set up keyboard shortcuts, etc. I still don't fully understand how to use it, but I'm sure I'll adjust and understand it more along the way. I think it's gonna be a pretty interesting app to use, especially since it's so detailed.
I'm excited to get into building scenes the most. I feel like I'm gonna have fun looking at the final or WIP and see how I progress as I understand it more (especially since it'll be more important later on in senior year when we get to make a game). I hope that this app ends up living up to the expectations I have though, because I'm worried I'm not gonna be able to get the amount of detail and shading that I want without the computer lagging out. Something I struggled with is that when I pulled up one of the menus (the one supposed to change the interface) nothing was there, and I think it was glitching a bit. As of now, I haven't found a solution for this problem, but when the new teacher gets here I'll try to ask her about it.  My art skills have definitely improved over the year. I felt as though the extended freedom throughout the year contributed to this. Mainly, I felt as though I improved on filling in space and utilizing more detail (but spending about the same amount of time, or less on the drawing). I found myself enjoying the assignments more and actually feeling fulfilled on the finished product.
I mainly used the sketch assignments throughout the year to consider the amount of detail in robots. In complete honesty, I don't really enjoy drawing things such as robots or machines in general, because they have so much detail for no gain and somehow the detail is detailed. Overall, I used them to really scope out drawing things I wasn't used to. When I started, I really wanted a sci-fi city with some sort of person at the front. I actually started with the buildings + person at the front, then started considering the rest. Honestly, I felt as though just a city might feel kind of not using the tools from the year, so I decided on a more cyber city and added the ogre. I wanted to add the ogre because it felt slightly more futuristic, especially since in my head I've created this fake backstory where the ogre is basically a dictator and eats criminals. At the beginning of the year, I didn't really know how to use all the space and ended up with some pretty empty sketches. I didn't know what else to add in for the things such as battle scenes. The first two especially perplexed me, and there ended up being a lot I was unhappy with. For the third quarter, I started adding more things to fill space and make it seem more realistic and have some emotion. Especially for this last sketch, I feel like I filled in a lot of space and added more detail without really having to worry or trying to add too much for far away areas. Overall, I'm really happy with this sketch and that just shows me that these sketches have even improved my self confidence in art as I improved.
For this project I used Premiere Pro. To start out, I imported all of the clips I recorded for the video. After putting an intro together, I added my videos in a way that made sense. I found a sound on Bensound that worked with the theme of the video, and added it on top. I then changed around some of the voice settings to make sure the sound didn't overpower the talking. After that, I made some sped up parts (voice only) and some slowed down parts (for dramatic commercial effect). Finally, I added transitions, and of course a credit outro.
One of the major problems I ran into was changing the voice settings. Overall it was pretty confusing figuring out how to make the music quieter and the people louder, and when I did, I had to go through and make sure it was applied to all clips. I think my favorite part of this process was filming. I got to film with Janai, and we have so many bloopers. We had a lot of fun even though it was very polleny out and both of us were 100% having allergies (thats why I sound a bit congested) Janai is definitely a movie star now so I definitely did my job.
So for this assignment I used Premiere Pro again, going back to one of my old assignments (the color one) and I added/changed some things up a bit. To start, I went into the transform settings of the text and made it slide onto the screen as it gets bigger. I also added another red image that fades in and out of opacity for a bit into the video.
One struggle that I had was that it kept not exporting right, being only one second and not actually a video, but thanks to Mr. B's confusion and then help, I figured out that I actually needed to select the whole video during the export video. Another problem was apparently sizing the image, but it turned out that it was just too big so I couldn't see the edges. I fixed this by going into the edit menu for it and turning the size down. My favorite part of the assignment was figuring out the transform/editing part. I'll definitely be able to use this setting later, especially in the MP assignment, so I'm excited to experiment more with stuff like this, especially more with the opacity in more exciting ways.
For this assignment I used Premiere Pro. I started out by choosing the clips that I wanted to use. Then I decided how I wanted the joke to be executed and made sure the "transitions" were smooth and worked well with the video. I added a "sad" sound as part of the joke because he hates the joke.
A problem I ran into was that I kept forgetting my headphones, so I didn't know what it sounded like. To fix this, I listened at home and planned to bring in my headphones later (not today but still) I also struggled a bit finding a sound, because I'm not the biggest fan of Bensounds but I ended up choosing a pretty stereotypically sad one so I think it worked out. In the end my favorite part was putting together the clips and choosing how I wanted them to work. I definitely resonate deeply with the guy in white because I don't like the joke. This activity was a bit more simple, so there's definitely not as much to talk about. |